09 Eylül 2007 Pazar

BUTT & THIGHS: How to work out exercise tips w/ Doug Jones

Butt Workout

Butt Exercises video

Biceps workout for women

Biceps workout can be every arm movement similar to the movement when you touch your shoulder with hand. Try to touch your shoulder – you lift the hand, bend elbow and touch shoulder with fingertips. This is the most effective exercise.

Now you need little dumbbells (or small bottles of mineral water or just take a book in every hand) because you have to give some hardship to your biceps muscles. Now lift the weights to your shoulders. This is basic biceps workout.

biceps workout


Important things for biceps workout:

- You have to move only hands from down to up. Monitor your body and isolate all other muscles.

- At the beginning put back against the wall and lift dumbbells to the shoulders. You have to feel tension only in your front arms.

- When lift dumbbells exhale, when go down inhale. Proper breathing is very important.

- Do as many repetitions as you can (10-20).

- Rest 30 seconds and do another 2 sets of 10-20 reps.

Rest for 2 minutes and after that do 3 sets of 10 reps from the following exercise. Take dumbbells, bend elbows and in this position lift your elbow to the height of shoulder.

biceps workout


Rest for 2 minutes and start with another biceps workout, which I called “too squise” the best from beceps muscles. It is similar to previous exercise. Now make little movements (lifts) to the ceiling. You have to feel tension in biceps only.

biceps workout


Important things for this biceps workout are:

- Move your arm from shoulder, only this movement, isolate all other muscles.

- To be sure that you isolate all other muscles put your back against the wall.

- Breath normally.

- Do 3 sets of how many reps you can (10-20), rest 30 seconds between sets.

Does best biceps workout exist?

Subscribe to my free video workouts and I will send you a password for a page where I publish them. You will receive free videos for fighting cellulite and all women's issues.

Butt Workout – More Effective Exercises

I receive many letters related to butt workout that makes perfect butt. If you have questions contact me trough online form. There are several exercises for butt, none of them is more effective than the others and my advice is to alternate different exercises, because muscles have the ability to remember and to quickly adapt. Every time you have to shock your body, to surprise with different workouts and exercises.

Start this butt workout with exercise #1 – butt and back thigh

Lay on the floor, lift hips, and tighten butt and thighs as strong as you can. Move the butt up and down as shown on picture bellow:

butt exercise


What is important for this butt and thigh exercise?

- Tighten butt and thighs muscles and keep them tighten while move butt up and down.- Do as many reps as you can – 20 – 50.

Extension to the previous butt exercise is following exercise:

butt exercise


Hold butt and thighs tightened; the butt is in the highest lifted position. Fix foots on the floor and move quickly only knees. Important for this exercise is to move only knees and to keep butt and hips muscles tightened. Try to do this exercise without rest after previous.

Next exercise is for butt, legs and lower ab at the same time

butt exercise


Lay on the floor, lift the butt, step with one leg and the other leg is straight, parallel to the floor. Flex the foot and lift to the ceiling. Try to make 10-20 reps. Per leg.

Important for this exercise is to keep the leg straight and tightened. Lift the legs as high as you can but more important is to hold it straight and not to bent knees.

If you do your exercises maybe you want to speed up the weight loss with "3 weeks - 9 pounds" diet. Read more about this mega effective weight loss diet.

If you read and study every exercise, click here to start the video butt workout.

Top Perfect Butt Exercises

I'll share with you my top exercises to build the perfect butt. But before we start with exercise video tour, please read below two simple exercises and do them when you can, because they don’t need much effort and you can use them in your daily routine.

The passive exercise – you can do it everywhere. Tighten and release the butt muscles, trying to hold them tightened as long as possible.

You can do this exercise while watching television or preparing dinner, you can flex your butt muscles, hold as long as you can and rest for a while.

Passive butt exercise
Repeat this routine until your butt feels warm and you cannot to make any more repetitions.

You can make this exercise while standing or sitting – under the shower or in the bathtub, at work in front of the computer.

The good news is it also tightens the back of thighs and the abs.

Active butt exercise
The active butt exercise.

You can do this while watching television.

Get on your palms and knees on the floor.

Raise one leg back and up, keeping your knee bent.

The movement is from the hip joint while the back and the waist remain still.

Visualize pushing your foot up towards the ceiling but without extending the leg.

Resting position
Alternate for 20 repetitions on each leg without a break. Sit back on your folded legs and relax for 30 seconds.

Make another 2 sets of 20 repetitions on each leg.

The important points here are:

- To feel tension in your perfect butt (start think your have nice butt and routines will make the other work).

- Do not move your waist, move only the leg. If you disregard this condition your waist will hurt.

Click here for 1 exercise for butt, abs and legs at the same time. 3 muscles with 1 exercise.

Now, let’s start our video tour, which are the best perfect butt exercises.

#1 Squat
Squats are not easy. You need practice to do them properly.

More exercises for perfect butt

Sexy legs


Action #1

You have to melt all the fat between your muscles and skin. This fat is as jelly – without shape, staying around your hip muscles it makes you look as soft, formless woman. You need nutrition plan to “correct” your legs. Check diet section for ideas what and how to eat.

Action #2

Workout entire body. I recorded my home workouts and put them online. If you want you can immediately start workout with me. Go to free workout routines.

Action #3

You have to prepare your skin for your new look at the very beginning. It is very usual people who loose weight very quickly, to look as they wear their skin as loose clothes. You have to think for this moment from the start of your diet and workout.

If you plan to slim down up to 10 pounds (5 kilos) your skin will be less influenced. But if you wish to burn more weight, you have to be prepared for the effect of diet - stretch marks. You can do 2 things in combination to make ready your skin for weight loss:

- Take multi vitamins with your diet. Check my vitamins for more information which I consider for best vitamin supplement.

- Apply stretch mark lotion to your skin – because pregnant women are always on risk from stretch mark, the best products to remove them are lotions for pregnant women. The other good thing for these lotions are that big companies are very careful with products for pregnant women and these lotions are as possible save (not with side effects) for people.

Don’t expect too much from stretch mark lotion – depending on how many pounds you loose, stretch mark lotion reduce stretch marks, but sometimes it can not remove them entirely.

08 Eylül 2007 Cumartesi

Core Exercises on the Ball

Core Exercises on the Ball

The exercise ball is a great tool for strengthening the abs, but it also helps you reach those hard-to-get-to muscles (such as the TVA and erector spinae), as well as improving your balance and overall coordination. The following exercises offer challenging ways to work a variety of muscle groups. Many of these moves are advanced exercises that require previous experience with an exercise ball. If you're new to the exercise ball, try this Beginner Ball Workout.

  • When first trying these exercises, you may want to hold onto a wall or prop the ball against something sturdy for added stability.
  • Perform 1-3 sets of 10-16 reps of each exercise, taking care to perfect your form before increasing sets or reps.
  • Avoid any moves that cause pain or that you're not clear how to do correctly.
  • Always see your doctor before exercising if you have any existing injuries or conditions.
Back Extension
ballback1.jpg (71197 bytes) ballback2.jpg (88873 bytes)
Position the ball under your hips and lower torso with the knees straight or bent. With hands behind the head or behind back, slowly roll down the ball. Lift your chest off the ball, bringing your shoulders up until your body is in a straight line. Make sure your body is in alignment (i.e., head, neck, shoulders and back are in a straight line), your abs are pulled in and that don't hyperextend the back.
Ball Balance
ballbalance.jpg (78349 bytes)
Position the ball under your abs and hips, hands on the floor and legs straight and off the floor. Hold that position for 20 to 30 seconds, keeping your body in a straight line, abs pulled in. Keeping balance, slowly raise your right arm out to the side, taking care not to roll or allow any part of your body to collapse. Hold that for a few seconds and switch arms. This is tougher than it looks!
Butt Lift
ballbutt1.jpg (94775 bytes)
ballbutt2.jpg (88667 bytes)
Lie on the ball with the head, neck and shoulders supported, knees bent and body in a table-top position. Lower the hips towards the floor without rolling on the ball. Squeeze the glutes to raise hips until body is in a straight line like a bridge. Hold weights on the hips for added intensity and make sure you press through the heels and not the toes.
Hip Extension
ballhipextend.jpg (79210 bytes)
ballhipextendleg.jpg (103615 bytes)
Lie down with feet heels propped on ball. Keeping abs tight, slowly lift your hips off the floor (squeezing the glutes) until body is in a straight line. Hold for a few seconds and lower. For added intensity, lift the hips and then take one leg off the ball, hold for a moment and lower. Repeat, lifting the other leg off the ball.
Ab Roll
ballroll1.jpg (120649 bytes)
ballroll2.jpg (92292 bytes)
Place your hands on the ball in front of you, arms parallel. Pulling your belly button towards your spine and tightening your torso, slowly roll forward, rolling the ball out as far as you can without arching or straining the back. Push the elbows into the ball and squeeze the abs to pull the body back to start. Avoid this move if you have back problems.
Ball Rotation
ballrotate.jpg (89687 bytes)
Lie with ball under shoulders and lower back, arms straight up over chest, palms together. Hold your body in a straight line from hips to knees. Tightening your glutes and abs, slowly twist your body to the left, sweeping arms parallel to the floor, then back up, repeating on the other side. Try not to collapse the body or roll too far, but really use your abs.
Ball Twist
balltwist.jpg (88563 bytes)

Get into a pushup position with the feet on either side of the ball (turning your ankles so that you are hugging the ball). Hold body in a straight line with abs pulled in, hips straight and hands directly under shoulders. Slowly twist the ball to the right while trying to keep your shoulders level, then to the left. Don't sag in the middle.

Ab and Core Progression

Ab and Core Progression

This Ab and Core Progression Workout shows some examples of how to progress from beginner exercises to moves that are a little more advanced. You'll know you're ready to move on to the next progression once you've mastered the move and can easily perform 2-3 sets of up to 16 reps with perfect form. To use this progression as a workout you can either do each exercise listed under the various fitness levels (e.g., all exercises under the Beginner column), doing them either one after the other circuit-style (for up to 16 reps) or one at a time for 1-3 sets of 10-16 reps. You can also pick and choose exercises from different columns (e.g., ball crunches, bicycle, plank, etc.). Use good form and see your doctor if you have any injuries or medical conditions.


Beginner Intermediate Advanced

begcrunch2.jpg (8217 bytes)
Crunches

Lie down with hands crossed over the chest or behind the head and feet on the floor, knees bent. Contract the abs and lift the head and shoulders off the floor, bringing the rib cage towards the lower belly. Lower slowly back to start and repeat.


Ball Crunches

Lie with the ball resting under the mid/lower back and place hands behind the head or across the chest. Contract your abs to lift your the torso off the ball, pulling the bottom of your ribcage down toward your hips. As you curl up, keep the ball stable..

all around med ball crunches 2
All Around Crunches
Begin with body straight over the ball, weight extended behind you (not shown). Contract the abs to lift and bring the weight over the head, crunching up and twisting to the right, contracting the right side of waist. Repeat for all reps and then switch sides.

begrevcrunch2.jpg (11108 bytes) begrevcrunch1.jpg (8426 bytes)
Reverse Crunches

Lie on your back with knees bent to 90 degrees, shins parallel to the floor. Contract the abs and lower the feet towards the floor, keeping the knees bent. Rotating the pelvis up and bring the knees back towards the ribcage. Don't let your back arch.


Plank
Begin on the forearms and knees and then lift up until you're on your elbows and toes, back flat, in a straight line from head to heels. Tilt your pelvis and contract your abs to prevent your rear end from sticking up in the air. Hold for as long as you can with perfect form.

ball squeeze and lift
Ball Squeeze & Lift
Lie on right side with ball between shins, squeezing it to hold it in place. Keep hips stacked and abs tight to stabilize your body. Squeeze inner thighs and contract the waist and hip muscles to lift the ball in the air. Lower and repeat for 10-12 reps and then switch sides. Do 1 set and work up to 2-3 sets over time.


Ball Crunches

Lie with the ball resting under the mid/lower back and place hands behind the head or across the chest. Contract your abs to lift your the torso off the ball, pulling the bottom of your ribcage down toward your hips. As you curl up, keep the ball stable..


Bicycle

Lie on the floor with knees bent and hand behind the head. Lift the shoulder blades off the ground and straighten left leg out while bringing the left elbow towards the right knee. Switch sides, bringing the right elbow towards the left knee. Continue alternating sides in a 'pedaling' motion.

kneetucks.jpg (84008 bytes) ballpike.jpg (90231 bytes)
Plank with Ab-roll

Start in plank (push up) position with stomach in and back flat (don't 'sag' in the middle). Roll the ball towards you with your feet, tightening the abs into a crunch. For a challenge, bring the ball into a pike, keeping legs straight.

begcrossover2.jpg (11106 bytes)
Oblique Crossover Crunches

Lie on your back and cross the left foot over the right knee. Lift the shoulder blades off the floor and twist to the left, bringing the right shoulder towards the left knee. Lower back down and repeat for all reps before switching sides.


Medicine Ball Crunches
Lie on your back with knees bent, medicine ball between the knees. Squeeze inner thighs to hold ball in place. Put hands behind head (cradle your head gently) and lift shoulders and hips off the ground in a crunch. Lower and repeat.

Side plank with oblique twist Side plank with oblique twist 2
Side Plank with Oblique Twist
Begin by lying on your side and push up so that your body is supported by right arm, feet stacked. Straighten left arm and sweep the left arm down and twist the body, turning it towards the floor while keeping the rest of the body in place.

Top 10 Most Effective Ab Exercises

Bicycle Exercise

Bicycle Exercise for Abs


The following exercises are part of the American Council on Exercise's study to determine the most effective ab exercises. Keep in mind that ab exercises won't reduce fat over the abs or create the coveted 'six-pack' abs. That comes with good genes and low body fat, although you should strengthen the abs along with the rest of the body to build muscle and raise your metabolism. For more about flat abs, visit my Abs Page for articles, workouts, FAQs and more.

The Bicycle exercise is the best move to target the rectus abdominis (i.e., the 'six pack') and the obliques (the waist), according to a study done by the American Council on Exercise. To do this exercise correctly:

1. Lie face up on the floor and lace your fingers behind your head.
2. Bring the knees in towards the chest and lift the shoulder blades off the ground without pulling on the neck.
3. Straight the left leg out to about a 45-degree angle while simultaneously turning the upper body to the right, bringing the left elbow towards the right knee.
4. Switch sides, bringing the right elbow towards the left knee.
5. Continue alternating sides in a 'pedaling' motion for 12-16 reps.
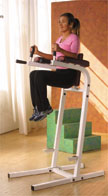

Captain's Chair

The Captain's Chair is the second most effective move for the rectus abdominis as well as the obliques and can be found in most health clubs and gyms. To do it right: 1. Stand on chair and grip handholds to stabilize your upper body.
2. Press your back against the pad and contract the abs to raise the legs and lift knees towards your chest.
3. Don't arch the back and remember to breathe smoothly.
4. Slowly lower back down and repeat for 12-16 reps.


Exercise Ball Crunch

Exercise Ball Crunch

The exercise ball is an excellent tool to strengthen the abs and comes out number three for working the rectus abdominis. To do it right:

1. Lie face-up with the ball resting under your mid/lower back.
2. Cross your arms over the chest or place them behind your head.
3. Contract your abs to lift your torso off the ball, pulling the bottom of your ribcage down toward your hips.
4. As you curl up, keep the ball stable (i.e., you shouldn't roll).
5. Lower back down, getting a stretch in the abs, and repeat for 12-16 reps.


Vertical Leg Crunch

Vertical Leg Crunch
Vertical Leg Crunch

The vertical leg crunch is another effective move for the rectus abdominis and the obliques. To do it right:

1. Lie face up on the floor and extend the legs straight up with knees crossed.
2. Contract the abs to lift the shoulder blades off the floor, as though reaching your chest towards your feet.
3. Keep the legs in a fixed position and imagine bringing your belly button towards your spine at the top of the movement.
4. Lower and repeat for 12-16 reps.


Torso Track

The Torso Track is a tough exercise because it can hurt your back if you're not careful.

1. Grip the handles of the Torso Track and pull the abs in without holding your breath (as though bracing them).
2. Exhale and glide forward as far as you comfortably can. If you collapse in the middle and feel it in your back, you've gone too far.
3. Contract the abs to pull your body back.
4. Add tension by using more tension chords.

View this exercise.


Long Arm Crunch

Long Arm Crunch

This move, ranked 6th in the ACE study, emphasizes the upper part of the abs. To do it right:

1. Lie on a mat and extend the arms straight out behind the head with hands clasped, keeping the arms next to the ears.
2. Contract the abs and lift the shoulder blades off the floor.
3. Lower and repeat for 12-16 reps.


Reverse Crunch

Reverse Crunch
Reverse Crunch

It may seem like the reverse crunch is for the lower abs but, remember, the rectus abdominis is one long muscle, so you can't separate upper from lower. To do this move right:

1. Lie on the floor and place hands on the floor or behind the head.
2. Bring the knees in towards the chest until they're bent to 90 degrees, with feet together or crossed.
3. Contract the abs to curl the hips off the floor, reaching the legs up towards the ceiling.
4. Lower and repeat for 12-16 reps.
5. It's a very small movement, so try to use your abs to lift your hips rather than swinging your legs and creating momentum.


Full Vertical Crunch

Full Reverse Crunch

In a full verticul crunch, you really work the abs by involving both the upper and lower body. To do it right:

1. Lie on your back and extend the legs up towards the ceiling.
2. Place hands behind your head (lightly cupping it) and contract the abs to lift the shoulder blades off the floor.
3. At the same time, press the heels towards the ceiling, creating a 'u' shape with the torso.
4. Lower down and repeat for 12-16 reps.


Ab Rocker

The Ab Rocker (or roller) is number 9 for targeting the rectus abdominis. To do it right:

1. Sit on the Ab Rocker and grab the bars in each hand.
2. Contract the abs and rock forward, originating the movement from the abs rather than using momentum.
3. Release and repeat for 1-3 sets of 12-16 reps.
4. Go slowly to reduce momentum. Try to focus on the abs rather than pushing with the arms.

View this exercise.


Plank on Elbows and Toes

Plank
Plank

The plank exercise ranked number 10 in the ACE study and is a great way to build endurance in both the abs and back, as well as stabilizer muscles. To do it right:

1. Lie face down on mat resting on the forearms, palms flat on the floor.
2. Push off the floor, raising up onto toes and resting on the elbows.
3. Keep your back flat, in a straight line from head to heels.
4. Tilt your pelvis and contract your abdominals to prevent your rear end from sticking up in the air.
5. Hold for 20 to 60 seconds, lower and repeat for 3-5 reps.

Total Body Strength for Seniors

Total Body Strength for Seniors

1. See your doctor before you begin any exercise program
2. Begin with a 5-10 minute warm up of light cardio (walking in place, etc.)
3. Perform each exercise for 12 repetitions, resting when you need to, and start with no weights or light weights
4. Stretch after each exercise

Do this workout 1-2 non-consecutive days a week, taking at least one day of rest between workouts. For best results, combine this workout with regular cardio and a healthy, low-calorie diet. Click on pictures for more detailed view.

Bench Sit & Stand
Stand in front of a chair (sit down first to make sure it's behind you!) with feet about shoulder-width apart. Contract the abs and sit down on the chair. As soon as you make contact with the chair, stand back up and try to do so without rocking back or using momentum. You can place your hands on your thighs if you need to. For added intensity, hold a medicine ball or a dumbbell and don't sit all the way down--stop just before your backside touches the seat (picture 3).

seniorchairsit1.jpg (13119 bytes) seniorchairsit2.jpg (15714 bytes) seniorchairsit3.jpg (19440 bytes)

seniorballtap1.jpg (10459 bytes) seniorballtap2.jpg (9803 bytes)

Ball Taps
Sit in a chair and place a ball front of both feet (a mid-sized ball works best). Sit straight up and try not to rest against the back of the chair, keeping your back straight and your abs contracted. Lift your right foot and tap the top of the ball and take it back down to the floor. Switch sides and do the same with your left foot, alternating each foot for all repetitions. For added intensity, sit on an exercise ball to challenge your balance or try the exercise while standing.

Step Ups
You can do this exercise on a staircase or on a step if you have one. If you're on a staircase, stand at the bottom step and step up with your right foot. Bring your left foot up onto the stair next to your right and then step back down on the floor (hold onto a rail if you need to). Perform all reps by stepping up and down with the right foot. Then switch sides and start with your left foot. If you don't have a staircase or a step, you can simply do another set of ball taps.

{Not Shown}

seniorhamstringcurl.jpg (18379 bytes)

Hamstring Curls
Stand in front of a chair and hold onto it for balance if you need to. Bend your right knee, bringing your foot up behind you (like you're kicking your own butt) and keeping the right knee pointing towards the floor and right next to your left knee. Slowly lower back down and repeat all repetitions before switching to the other leg. For challenge, do it without holding onto the chair or add light ankle weights.

Knee Lifts
Hold onto the wall or a chair for balance if you need to. Keep the abs contracted and bring the right knee up to hip level, knee bent at 90 degrees, and lower back down. Repeat all reps on the right leg and then switch sides. Add ankle weights or a resistance band for added intensity. You can also do this without support for a challenge.

seniorkneeraise.jpg (16234 bytes)

seniorleglift.jpg (18248 bytes)

Side Leg Lifts
Stand sideways to a chair or wall for support and lift one leg out to the side, foot flexed and hips, knees and feet in alignment. Try to lift the leg without tilting at the torso--hold the torso upright as you lift the leg a few inches off the ground. Lower back down and repeat all reps on the same leg before switching sides. Add ankle weights for added challenge.

Wall Push Up
Stand a few feet away from a wall and place hands on wall at shoulder level, a few inches wider than shoulders. Pull the abs in and, keeping back straight, bend elbows and lower body towards the wall until elbows are at 90 degree angles. Push back to start and repeat. The further away from the wall you are, the harder the exercise. Make sure you don't sag in the middle--keep the abs tight and the back flat.

wallpush2.jpg (18965 bytes) wallpush1.jpg (20213 bytes)

medballchesttwist1.jpg (20662 bytes) seniorballsqueeze.jpg (15525 bytes)

Chest Squeeze with Med Ball
Sit on ball or chair, back straight and abs in. Hold a medicine ball at chest level and squeeze the ball with the palms of hands to contract the chest. While continuing to squeeze the ball, slowly push the ball out in front of you at chest level until elbows are almost straight. Continuing the pressure with your hands, bend the elbows and pull the ball back to chest.

Lat Pulls With Bands
Stand or sit holding a resistance band in both hands up over your head. Hands are wider than shoulder-width apart and back is flat, abs engaged. Keep the left hand in place and contract the lat muscles (at the sides of your upper back) to pull the right elbow down towards the ribcage. Press back up and switch sides, alternating right and left for all repetitions.

seniorlatpull.jpg (14508 bytes)

bicepside3.jpg (34880 bytes)

Lateral Raises
Stand or sit holding light dumbbells in both hands at the sides. Keeping the elbows slightly bent and wrists straight, lift the arms up to the sides only to shoulder level (palms face the floor). Lower back down and repeat for all reps. You can use full water bottles or soup cans for weights if you don't have dumbbells.

Bicep Curls
Sit or stand holding dumbbells in both hands, palms facing out. Contract the bicep (front of the arm) and curl the weight up towards your shoulder (without touching the shoulder). Lower back down, but keep a slight bend in the elbow at the bottom--don't swing the weight and keep the elbows in place as you curl the weights.

seniorbi1.jpg (20104 bytes) seniorbi2.jpg (15439 bytes)

seniortricep1.jpg (12957 bytes) seniortricep2.jpg (13521 bytes)

Tricep Extension
Sit or stand and hold a dumbbell in the right hand straight up overhead and directly over your shoulder. Your palm should face the front and you can use your other hand to support the right arm. Bend the elbow and lower the weight down a bit behind your head (the elbow should be facing the right side of the room) to about 90 degrees. Contract the back of the arm to pull the weight back up and repeat.

Top 10 Butt Exercises


Are you happy with your butt? Most of us aren't. They're too small, too big, too saggy, too flabby...this list goes on. The right cardio exercise and weight training activities (like squats and deadlifts) can make a difference in your backside and help you get those buns of steel. Find out the best cardio and strength training exercises for strengthening and firming up your rear.


1. Squats

Squats are one of the best exercises you can do for your hips, butt and thighs. There are many different types of squats, including the Chair Squat pictured here. Stand with feet hip-width apart and squat, keeping back straight, abs in and knees behind your toes. Let your butt lightly touch chair and squeeze butt to stand up. Repeat for 2-3 sets of 8-12 reps and add weights for more intensity. This gallery of squat images shows a wide variety of squats you can add to your current routine.


Basic Chair Squat


The chair squat is a great way to learn proper form while having some support. The chair forces you to keep your knees behind your toes and it's always there if you lose your balance and need to sit down. This is a great choice for beginners but you can make it more difficult by squatting down until you're just above the chair.

Squats are one of the best lower body exercises you can do. Why? One reason is that squats are multi-joint exercises which target all the muscles of the hips, glutes and thighs. This version, which requires no weights or equipment (other than a chair) is great for beginners, for anyone with knee problems or for those who are overweight and need a bit more support. It's also great for anyone wanting to add more functionality into their lives because it mimics the movements we do each time we sit down or stand up.

1. Place a chair just behind you and stand in front of it with feet about hip- or shoulder-width apart.
2. Contract the abs and keep them tight as you bend the knees and slowly squat towards the chair.
3. Keep the knees behind the toes as you sit down on the chair for a few seconds.
4. Contract the glutes and hamstrings to lift up out of the chair and begin extending the legs.
5. Fully extend the legs until you're back to standing position.
6. Repeat this for 1-3 sets of 10-16 repetitions.
7. To progress, squat down until you're just hovering over the chair, but not sitting all the way down.
8. Always keep the knees in line with the toes!


Squat with One Dumbbell


Once you're able to do more than 16 Chair Squats, it's time to progress and add some challenge to your squats. One option is to hold a dumbbell as you squat, which is a great way to add intensity without putting any extra load onto the spine (as in barbell squats below). Here's how to do it:

1. Stand with feet hip- or shoulder-width apart.
2. Hold a medium-heavy dumbbell in front of your body with arms straight and elbows slightly bent.
3. Bend the knees and lower into a squat. Stop when your knees are at 90 degree angles OR before you lose the natural arch of your back.
4. Contract the glutes and legs while stabilizing your body with a strong torso.
5. Slowly stand back up without locking the knees and repeat for 1-3 sets of 10-16 repetitions.
6. Always keep the knees in line with the toes!


Squat with Dumbbells


Another version of the dumbbell squat involves holding two dumbbells. You can either hold them at your sides or just above the shoulders (as shown). Holding dumbbells is just one more way to add intensity to your workouts and build muscles in the glutes, hips and thighs. Here's how to do it:

1. Stand with feet hip- or shoulder-width apart.
2. Hold medium to heavy dumbbells in each hand just outside the thighs or with arms bent above the shoulders.
3. Bend the knees and lower into a squat. Stop when your knees are at 90-degree angles OR before you lose the natural arch of your back.
4. Contract the glutes and legs while stabilizing your body with a strong torso.
5. Slowly stand back up without locking the knees and repeat for 1-3 sets of 10-16 repetitions.
6. Always keep the knees in line with the toes!


Barbell Squat


Barbell squats are a more intense version of squats, requiring more work from the largest muscles in the body. Barbell squats are a great addition to a workout, provided you do them correctly. Adding a weight to your shoulders puts much of that load onto your spine as well, so take care when adding weight onto the shoulders. Here's how to do it:

1. Stand with feet hip- or shoulder-width apart.
2. Place the barbell just above the shoulders on the trapezius muscles (i.e., the 'meaty' part of the shoulders). If you feel uncomfortable, you can use a bar pad to protect your back.
3. Bend the knees and lower into a squat. Stop when your knees are at 90-degree angles OR before you lose the natural arch of your back.
4. Contract the glutes and legs while stabilizing your body with a strong torso.

5.Slowly stand back up without locking the knees and repeat for 1-3 sets of 10-16 repetitions.
6. Always keep the knees in line with the toes!

Take care when doing this exercise for the first time. Start with a light weight you can easily handle and practice getting your form perfect before moving on to heavier barbells.


Smith Machine Squat

The Smith Machine squat can be a great addition to your workout routine. The Smith Machine consists of a rack with a suspended barbell that moves up and down on steel runners. There are safety pegs there to catch the weight if needed, which makes it great for those who want to lift heavy but don't have spotters handy.

The Smith Machine squat is similar to a barbell squat, but you should perfect that move and develop balance and a feel for the exercise before moving on to the Smith Machine. Here's how to do it:

1. Stand with feet hip- or shoulder-width apart.
2. Place the bar just above the shoulders on the trapezius muscles (i.e., the 'meaty' part of the shoulders). Keep in mind that some Smith Machines will reduce the weight of the bar and some won't, so take care when adding weight the first time.
3. Bend the knees and lower into a squat. Stop when your knees are at 90-degree angles OR before you lose the natural arch of your back.
4. Contract the glutes and legs while stabilizing your body with a strong torso.
5. Slowly stand back up without locking the knees and repeat for 1-3 sets of 10-16 repetitions.
6. Always keep the knees in line with the toes!

One note: there is some controversy about the Smith Machine and the fact that some believe it takes the body through an unnatural range of motion, which can cause injuries and imbalances. Do a variety of squats in your workouts and you can keep your body balanced and strong.

Plie Squat


The Plie Squat involves a variation on foot placement that helps target your leg muscles in different ways. In a plie squat, for example, you incorporate a bit more inner thigh than in traditional squats. This can be a nice variation to add to your routine if you need a new challenge. Just take care when lowering down and only go as far as your flexibility will allow. Here's how:

1. Begin in a wide stance with toes out at a comfortable angle. Your knees will need to stay alined with your toes, so don't go out too far.
2. To add weight you can hold dumbbells on the upper thighs, a single dumbbell in front or a barbell on the shoulders or behind the head.
3. Bend the knees and lower down into a squat, keeping knees in line with toes, abs contracted and back straight.
4. Only go down as low as you can without compromising your flexibility or your balance.
5. Push back to start without locking the knees.


Front Barbell Squat


A front barbell squat is the same as other squat variations except for the placement of the weight. In a front squat, the barbell rests on the front of the shoulders, held in place by crossing the arms over the bar. By moving the weight in front of you instead of behind you, you change your center of gravity and, thus, change the focus of the exercise to the quads. Because of how you're holding the weight, you'll need to use a lighter weight for this version than the tradtional barbell squat. Here's how to do it:

1. Stand with feet hip- or shoulder-width apart.
2. Place the barbell on the front of the shoulders and cross the arms over the bar to hold it in place.
3. Bend the knees and lower into a squat. Because of how you're holding the weight, your torso will remain vertical and you may not be able to squat down as low, so take care not to compromise your balance.
4. Contract the glutes and legs slowly stand back up without locking the knees and repeat for 1-3 sets of 10-16 repetitions.
6. Always keep the knees in line with the toes!


Wall Sits


The wall sit is a bit different from typical squats since you're holding a static position for a certain period of time, rather than working through an entire range of motion. This is a great exercise you can do anywhere without any equipment to help you build endurance in the lower body. Here's how to do it:

1. Stand in front of a wall (about 2 feet in front of it) and lean against it.
2. Slide down until your knees are at about 90-degree angles and hold, keeping the abs contracted, for 20-60 seconds.
3. Come back to start and repeat, holding the squat at different angles to work the lower body in different ways.
4. To add intensity, hold weights or squeeze a ball between the knees.


One-Legged Squats


The one-legged squat is an advanced exercise and one you should take care with if doing for the first time. Putting all your weight onto one leg will really challenge your balance and stability while adding intensity to your exercise routine. This version is shown with support from an exercise ball. Here's how to do it:

1. Place an exercise ball behind your lower back against a wall and lean against it.
2. Lift left foot off the ground slightly, moving the right foot closer to the middle to get your balance.
3. Contract the muscles of right leg and, keeping left leg lifted, lower down into a squat (only as low as you can manage). You can rest your hands against the wall if you need to for added balance.
4. Push back to start and repeat all reps on right leg before switching sides.
5. This is a tough exercise, so practice without the ball and while holding onto something for balance.


Choosing Your Squats and Safe Squatting
So, now you have some idea of different types of squats you can do but how to you choose? If you're just trying to get strong and healthy or maybe lose some weight, any type of squat will do. If you're a beginner, starting with the body weight squats and slowly moving up to the weighted squats is the best way to go. As you get really good at it, you can start on the more advanced variations (front squats, barbell squats and one-legged squats). Wherever you start, squatting is an excellent exercise that will work every part of your lower body!

Tips for Squatting Safely

1. Keep the weight over the ankles and keep the heels on the floor throughout the movement.
2. Keep the knees in line with the toes.
3. Try not to go lower than 90 degrees.
4.Keep the knees behind the toes.
5. Keep the shoulders back, a natural arch in the lower back, and the head and neck in a neutral position throughout the exercise.